
an online portal for guitarmakers, guitar enthusiasts, and students
following Natelson & Cumpiano's treatise, GUITARMAKING: Tradition & Technology

Alan Chapman's marquetry-rosette-making technique
A master's advanced marquetry rosette making technique, step by step
The mosaic-marquetry process is an ancient decorative woodworking technique. The process is supposedly of Persian origin, later passed on to the Moors in Northern Africa and finally appeared as embellishments on guitars during the 800-year Muslim occupation of Spain.
In 1999, tutorial student Gary Williamson asked me to persuade my dear friend, master classical guitarmaker and marqueter Alan Chapman, to come in for a day and show us how he makes his wonderfully precise rosettes. I kept a documentary record of the process. Here is his process sequence:

1- The veneer slats are glued up and sawn into 'columns'.
Applying glue to the veneer slats
The tinted veneers are cut to the same size (about 1-1/2'' x 7-1/2''), and placed in the order dictated by your graph-paper design, like this one. You will make a unique sandwich of veneers for each column in the design.
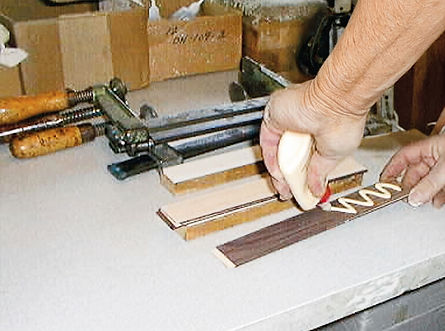
Gluing the ordered slats together
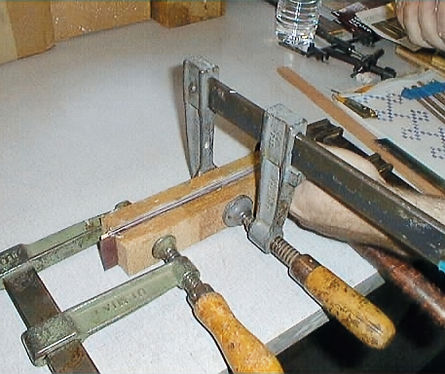
The veneer slats are glued together in the correct order and clamped firmly together, flattened between two large, stiff hardwood glueing cauls, using steel clamps to ensure sufficient pressure.Thus each column in the graph-paper design will have its own glued-together sandwich, with its veneers glued together in the color (or specie) order of each column. If your design has eight columns, you will end up with eight sandwiches.
Sawing the column slices from a sandwich.
Now you can slice each sandwich into thin slats called columns (because they represent the columns in the design). Note that a fine-tooth (i.e., 1/32'') slitting blade (or "variety saw blade") is used on the table saw, which pokes up through a thin wooden saw-table throat plate--keeping the slats from falling inside the saw. In this way, you can saw many similar column slices off the edge of the sandwich. In the photo, note the column slice beside the saw blade.

The column slats are gathered into 'logs'
After cutting all the sandwiches into column slats, retrieve one column from each pile and tape the collection together in their proper order and orientation. Each collection will now glued into a 'log'.

The marquetry design emerges
Thus taped together, the end-grain of the assembled columns forms a quadriculated pattern identical to the original graph-paper design.

Tapering the log
Most luthiers that fabricate their own marquetry rosettes glue the column slats together to form a rectangular log (as above) and then just taper the two outer columns of the log "just a little bit" so that the 'tiles' cut from the end of the log conform together to form a circle. Thus, the outer columns of the tiles will be tapered—but the middle columns remain rectangular in cross-section. This results in the common "segmented" appearance of most rosettes.
However, before glueing the slats into a log, Alan goes to the additional trouble of tapering each and every individual column slat in the log by a tiny and calculated amount. The final result is worth it: Alan's rosettes are magically seamless and present a uniform, un-segmented marquetry pattern field to the view.
The actual taper angle of each slat that result in a perfectly circular and uniform rosette ring circle—can be calculated mathematically. To precisely taper each column slat before glueing them together into a log, Alan has devised a device which presses the slat firmly against a flat background, by means of acrylic plastic hold-downs which have two fingers which are bent down by heat bending, thus pressing down on the slat, but allowing the operator to pull the slat through. The device is attached to a router, as seen in the photos.
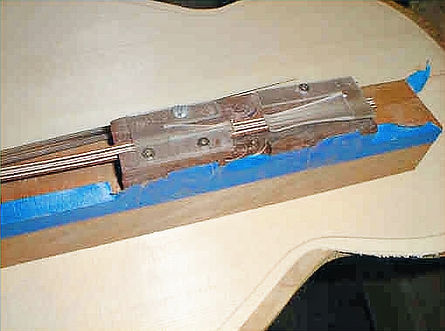
The router and its straight cutter is attached to the device in a cradle which allows Alan to shim it and determine the angle and the height at which the cutter is held over the slat. NOTE: The device is however, potentially dangerous, since the slat can get away from the operator and be launched like a spear across the room or into the operator's hand. Thus extremely heavy gloves must be used (Alan discourages any but the most machine-expert craftsmen to use this device. In early trials, he wounded himself badly until he learned how to manipulate the device.) Regardless, he still uses thick, leather protective gloves when using the device- SO DON'T TRY THIS AT HOME, FOLKS! The rest of us clowns must be content with tapering the two outer faces of the glued-up log with a far-safer scraper and sandpaper.

2- The column slats are glued up into a 'log'.
The Corian® clamping plates
To glue the column slats into logs, Alan relies on these small slabs of Corian®, a plastic counter-top material available in lumber yards which can be cut on ordinary saws, to glue the sliced rosette columns together into logs. The special advantage of this material is that it is exceedingly flat, exceedingly hard and quite impervious to water-soluble glues. Cleanup of Corian surfaces with water is also extremely easy.

The log elements will be encased between four Corian slabs: a floor slab, two side-slabs which contain the ordered columns between them...

...and a top slab.
Needless to say, the height of the columns must be carefully matched to the thickness of the side-slabs. Since Alan has scrupulously tapered each individual column, the edges of the side-slabs are also accurately angled to accept and match the tapered sides of the log. If you're doing the simpler, non-tapered columns, the side slab edge walls should, of course be vertical.

Applying glue to the column slats
Each column is laid flat and wetted (not flooded) with a moderate, film of glue, and laid on top of its partner in the log.

Placing the slats between the slabs
The glued column slats are placed between the Corian slabs. All care must be taken that the columns are oriented and ordered properly. All the elements are manipulated into the void between the two side slabs, until they are flush and aligned.

The encased log elements ready for clamping
The glued log elements pressed between the two side slabs are then placed on top of the floor slab and then covered by the top slab.

First clamp the top and floor slabs firmly but not tightly.

Then apply clamps across the side-slabs firmly, but not tightly. Then tighten all the clamps incrementally until the entire array is quite tight.

After an hour, unclamp, and begin the cleanup process. The log top is most easily cleaned using a scraper blade in the way shown. Take care not to dig into the Corian slabs.

The glued-up log is removed from the slabs and the sides of the log are then scraped clean with a small edge tool. If the log has been prepared with a square, rather than a tapered cross-section, now is the time to taper the appropriate edges of the log. This can be done by hand or on the table saw. For an invisible seam between the tiles, care must be taken that the edges of the log are tapered to the correct angle for the given design.

Alan Chapman cleans up the edges on the log on a flat piece of wood faced with 100-grit garnet sandpaper. He needn't taper the edges of the log (as you would if the log were rectangular) because he already tapered each individual column in the log before gluing it together.
