
an online portal for guitarmakers, guitar enthusiasts, and students
following Natelson & Cumpiano's treatise, GUITARMAKING: Tradition & Technology

Chapter 2 - Tools & Materials
Recommendations, sources & alternatives

Why is ebony black, mahogany red? Why is curly maple curly?
Be careful: they're not the same!
Softwood vs. hardwood
How does the difference matter?
The nine places your glue joint can fail
Open pore vs. closed pore
Why does it matter?
Caveats for each guitar glue: PVA, AR and Hide glue
What learners should know about their cutting tools
Why is ebony black, mahogany red? Why is curly maple curly?
Fall arrives in New England, and you can almost sense the trees preparing for the long, cold winter ahead. They signal the end of the season by painting their leaves with bright, fiery colors, which will soon drift to the ground, forming crisp autumn blankets. However, less dramatic changes are happening inside the trees, just beneath their tough, corrugated bark. If we had X-ray vision, we could peer through that protective layer and see a thin, oozing, vital underlayer. Over time, we could witness the living hydraulic process gradually winding down as the tree slowly drifts into deep slumber. The tree’s bark forms a cylindrical protective layer, safeguarding an exceptionally thin layer of growth activity known as the cambium. The cambium’s living tissue exhibits alternating periods of activity and inactivity throughout the year. During active phases, new wood is produced underneath the cambium by the incremental accumulation of new cells forming new cylinders around the previous year’s growth. Conversely, during inactive periods, the tree appears frozen in time, with only the biological clock marking the passage of cold hours. In temperate zones (for example, my back yard in Northampton, Massachusetts), spring marks the beginning and late fall the end of a yearly growth cycle that matches up to the starting and stopping of growth activity of the cambium. The cycle leaves its permanent imprint in the tree with these cylindrical growth layers. Much later, the evidence persists as a finely organized patterns of lines on the surface of the sawn lumber. Not so on tropical woods: constant climate and several growth periods during a single year (and, as a result, a far more gradual ebbing and flowing of life activity) result in no such obvious demarcations. This is why no well-defined growth rings can be seen on Central American mahogany or South American rosewood (the stunning colored lines on rosewood are not growth rings, as we shall later see). As fall approaches, and as activity just beneath the bark starts to slow down, cells created at the cambium will emerge smaller, darker, denser, more tightly packed than those born during the summer. The pattern of lines and spaces we can see on the lumber surface is simply that: light, large, square cells alternating with tougher, darker, flatter ones. Until next April or May, no more wood cells will be born. But spring brings on an awakening, and a spurt of activity once again commences. A cylinder of new cells appears all around the tree, just under the bark. These earliest cells first appear with soft, gelatinous walls and with no strong bonds holding them together. If you were to perversely plunge a knife into the bark and pry, the bark would easily become detached: the pulled-off scab would reveal a moist, scummy surface underneath. This is the time when farmers find removing bark from freshly cut trees the easiest - when the cambium is producing brand new, immature cells which are liquid and slimy. Thus, with gentle prying, the bark just sloughs off. This is certainly not so later in the year, when these same cells have matured and lignified; the bark must then be laboriously carved off the tree. May is also a time of year when naughty kids can wound a tree by pounding its trunk with toy bats, and crush those young forming cells under the bark. Scars, forever enshrined, will years later be deep inside the wood. The cambium is not so much a clearly defined region as it is a "line of activity" where cells appear, grow, and divide. As they divide, some grow outward towards the bark and others grow inward, adding to those already inside the tree. The outwardly-growing cells enter and become part of a region just under the bark known as the phloem. As the phloem accumulates cells, it actually moves, causing the trunk's slow, swelling increase in girth. The swelling of this outer cylinder forces the bark to split and crack, like dried mud on an expanding balloon. New bark appears on top of the cambium, at the phloem, to fill in the cracks. The forming cells oriented towards the interior will form part of a stationary cylinder of liquid-conductive and nutrient-storing vascular tissue called the xylem, where they are deposited as growth layers. The first cell born into the xylem in May will become as firmly attached to the last one in November as all the other cells are attached to each other, leaving no consistent plane of weakness in the wood - the wood tissue remains cohesive across the start/stop region. That this is so is an impressive mystery of nature. The aggregate of large, low density cells that form early in the year are termed springwood, or earlywood. The stuff of the growth rings, the cells which form late in the year are termed summerwood, or latewood. These cells form the hard, stiff soundboard "reeds", so carefully counted by some luthiers. The very stiffest samples, however, are those displaying a predominating cross-grain structure of specialized cells which grow oriented towards the center of the tree, called ray cells. These can be barely seen on some samples but are unmistakable on others. They can be seen on the surface as ghostly cross-hatches, imparting both a furry-looking and luminescent quality to the soundboard. They appear most dramatically when a soundboard board is accurately quarter-sawn. However, even well-sawn samples can be deficient in these strength-inducing cells or possess them in a poorly developed form. We have seen how cells originating at the cambium get deposited in layers Onto the xylem. Here they perform their function of conduction and storage so critical to the living organism. But after these cells mature, they eventually stagnate and enter a state of perpetual dormancy. While living and vital to the tree, they exist in a zone within the tree near the cambium forming an irregularly cylindrical subdivision of the stem which is the sapwood. As they decline, their appearance usually changes and they become part of the heartwood, the central core of the tree. These forever-to-remain-dormant cells become dead parts of a living system - akin to hair and fingernails in people. And, as such, they are still useful, for they become the tough, fibrous mass that holds the tree upright. Both woods exist in the same tree in relative proportions which can very between trees of the same species, of different species, or within the tree itself. So sapwood cells "die" and become part of the heartwood. They undergo dramatic changes as they die. The cause of death is uncertain; reduced water requirement from the tree crown may cause the "shutting off" of sapwood cells. Perhaps the tree "poisons" itself by choking its cells with the waste products of its own breathing. Related to this death process is the progressive accumulation in these cells of a complex of diverse substances called infiltratives. Inflitratives are of primary importance to all woodworkers. They determine most of the visual, tactile and olfactory qualities of the heartwood and, as a result, the eventual appearance, usefulness, and value of the lumber. INFLITRATIVES For example, pigmented infiltratives will impart the characteristic chocolate brown color to walnut, the reddish hue to mahogany, the rainbow of colors seen in rosewood, and the black color of ebony. These pigments can also swirl through the tissue in varying concentrations, causing a dramatic marbling of color through the lumber ~d the creation of a "pigment figure" which is distinct from the figure imparted by the arrangement of the vessels and fibers (known as "grain figure"). But more on that later. Some infiltratives are commercially extracted and become--you're right: extractives. Some extractives are oily and aromatic. Extractives in redredar gives it its wonderful fragrance and insect - repellent properties. Extractives from other trees can be processed into camphor, anise, wintergreen, sandalwood incense and perfume bases (as are the volatile extractives found in Brazilian rosewood). Still other extractives are acidic, such as tannins; they can cause corrosion in contacting metals, and can as well interfere with the proper setting of paint and glue. The tannins in oak darken the cut surface when exposed to moisture. Thus, the many recognizable and commercially desirable (and undesirable) qualities of the heartwood are a result of the presence of these infiltrated substances. Some researchers believe that the infiltration itself may be the cause for the tissue to become heartwood in the first place. Trees can be classified on the basis of the distinctiveness of the heartwood. Some tree species have hardly any heartwood at all: these are called sapwood trees or trees with retarded heartwood. In some species the pigmented infiltratives are light colored (maple, spruce) and the heartwood remains light-colored: these are called light heartwood trees or ripewood trees. When the pigmented heartwood infiltratives are dark-colored, the heartwood is said to be obligatory colored and the trees are described as regular heartwood trees. Finally, facultatively colored heartwood, or irregular heartwood trees are trees in which the pigmented substances appear in some areas of the heartwood and not in others. Stunning visual effects are a result. Enzymes infiltrating the heartwood can change the color of the wood after it has been cut into lumber. These enzymes will oxidize on exposure to air causing the darkening of the freshly cut lumber surface. African Padouk is blood red when freshly cut, and weeks later, the surface metamorphoses into a dull brown. Enzymes will also darken wood touched by sweaty fingers. Fungal attack and other forms of decay will cause random patches of contrasting colors to appear on the surface of some of the tropical hardwoods used by luthiers. In some cases, the fungus itself is colored and in others the fungus will cause chemical changes in the pigmented materials in the wood cells. Most pigmenting fungi will not significantly affect the strength and other mechanical properties of the wood although, in some cases, the impact resistance of the material may be somewhat reduced. Insect attack may also cause localized color changes, usually when boring insects carry these fungi into the bore holes. All these changes can be commonly seen in rosewood, which can lie in the jungle for months after felling, a time during which considerable biological attack can occur. The wood then develops blotches of inky-black stains around every bore hole. GRAIN / FIGURE The terms "grain" and "figure" are used interchangeably by most people. Wood technologists, however, make a distinction between the two. To them, grain usually describes the pattern of orientation of the fibers within the sample, while figure describes all the plainly visible surface characteristics of the sawn piece. In the trade, however, figure implies something special, a quality found in some pieces which imparts a higher-than-average economic value. In actuality what we can usually perceive of the wood is a result of the normal growth of the wood and the particular way in which it has been cut from the log ~ abnormal grain structure and uneven pigmentation. Although normal grain structure is part of the visible "grain figure" of the wood, the grain is not generally considered part of the "figure" unless it is in some way notable or dramatic. Usually the grain becomes striking when genetic or environmental circumstances result in distorted or abnormal grain. Often, pigment figure and grain figure coincide. But in many cases the two figures ignore each other in interesting and dramatic ways. A particularly striking visual effect occurs when the heartwood grows to one side of the stem rather than straight through the middle. This sometimes occurs in the jungle, where the tree's leafy crowns are crowded by adjacent trees. The crown thus thrives off to one side of the tree, and the heartwood in the stem correspondingly becomes situated to one side of the trunk. The dramatic opposition of pigment figure to grain figure in Brazilian rosewood may be a result of this type of heartwood growth. Pigment figures are obvious in such native hardwoods as black walnut and sweetgum, and in imported timbers such as Circassian walnut, zebrano, zebrawood and Brazilian rosewood. Pigment figure can exist as irregular blotches in the log, such as in sweetgum and Brazilian rosewood, and thus will appear as swirls no matter how the plank is cut from the log. But pigment figure can also appear in regular formation, as it does so dramatically in zebrawood; in this case its appearance on the lumber surface precisely depends on how the plank is cut from the log. Grain figure can also cause an impressive wood surface appearance. Ribbon or stripe figure is the result of the spiral growth of wood fiber cells around the central axis of the trunk periodically reversing; i.e., the cells are oriented in a left-handed helix and then reverse to a right-handed helix. These reversals continue for the life of the tree. The wood is then said to have "interlocked grain". A plank which is quarter sawn from such a log will display a ribbon or striped figure. This display of light and dark bands arises from light being reflected differently from each separate zone of grain orientation. If the ends of a board possessing ribbon figure are reversed, the light and dark bands pop out in the reverse manner. Wood with pronounced interlocked grain can be seen on such domestic woods as sycamore and elm. Interlocked grain is the common condition in tropical woods, and luthiers come across it most commonly in mahogany. Curly grain figure occurs when fiber cells grow in waves. Curly growth usually occurs at right angles to the long axis of the tree. Best available information has it that it is caused by a genetic quirk which is passed on through several generations. It occurs most frequently in maple and birch, but can appear sporadically in many other woods as well, including walnut, rosewood, mahogany and ebony. A combination of interlocked and wavy grain results in an interrupted ribbon figure. When these grain stripes measure about a foot or more in length and appear twisted the patterns are called "broken stripe"; when the stripes are interrupted by irregular curly wrinkles the figure is termed "mottled". When the mottles are very fine, the pattern is termed "bee's-wing": it occurs with great rarity in mahogany. Another dramatic configuration present in a small number of flat-sawn maple boards is "blister" figure. The surface appears marked with alternating hollows and mounds, separated by narrow ridges. This is also a genetic anomaly and such a grain reflects light in the same reversing manner as ribbon figure. When the areas enclosed by the ridges are longer across the grain than parallel to the grain the figure is "quilted". We finally arrive at a familiar grain figure that is a source of much puzzlement and misunderstanding. "Birds-eye" figure results in localized, swirling distortions in the fiber alignment, caused by conical indentations which extend from the surface of the bark towards the center of the tree. Once started, these fiber disturbances continue in successive growth layers for the life of the tree. The disturbances appear as "bird's-eyes" on flat sawn lumber surfaces and as sausage-like configurations on quarter-sawn faces. Their actual origin remains hypothetical. Wood technologist Bruce Hoadley theorizes that their origin is both fungal and genetic. He suggests that early in the tree's life, fungal attack disturbs the genetic integrity of the cell division processes at the cambium. This sets the stage for permanent changes of the cambium and the subsequent production of "birds-eyes". When we behold a piece of wood, any piece, how much of what is happening on its surfaces and within its surfaces can we perceive? Take a closer look. Now look even more closely... ..from my class notes, in Wood Anatomy 1010, Prof. Bruce Hoadley, University of Masssachusetts at Amherst, Wood Technology Department

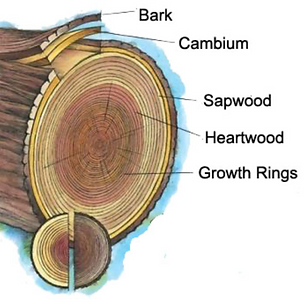

Be careful: they're not the same!
The term "quarter sawn" is commonly used to describe wooden boards that display their annular or growth rings—viewed on end— at 90 degrees to their widest face. This configuration demonstrably leads to the board being more resistant to distortion when subjected to changes in ambient humidity and in the case of softwoods, enhanced stiffness. Beginning instrument-makers, therefore, are traditionally urged to select “quarter-sawn” boards for their instruments and told that the way to find it is to look for this vertical end-grain. In truth, however, wood that has been "quarter sawn" yields few strictly vertical-end-grain boards. So, if you go to a lumber yard or hardwood dealer looking for "quarter-sawn" wood—expecting to find an ample supply of strictly vertical grain boards—expect to be disappointed. In the rare occasions when you do find a board with vertical end-grain, the chances that it was processed by quarter-sawing is very slim! Why this is, becomes apparent when you realize how lumber is commercially processed. The "quarter sawing" strategy is so-called because the log is first cut into quarters and then each quarter is sawn at a 45-degree angle, yielding...very little actually vertical end-grain lumber! Indeed, strictly vertical end-grain lumber is quite rare. That's because the purpose of quarter-sawing lumber is not to extract the greatest yield of vertical-end-grain lumber, but rather, to maximize the yield of lumber with straight-line grain-figure on its faces. “Plain sawing,” by far the most common lumber-processing method, results in the greatest yield of lumber and the widest boards of all. But it produces very few straight-grain-figure boards and very few vertical end-grain boards. It produces the greatest amount of wavy-grain or "cathedral" figured boards. Compared to plainsawing, quartersawing yields straight-grain figure on the faces; more vertical grain boards; but narrower boards and greater waste. Now look at the rift-sawing diagram: it would appear to yield 100% vertical-grain boards, but with the greatest amount of waste of all. It requires computerized equipment that rotates the log to maximize the yield of vertical-grain boards. But it yields the most vertical end-grain, straight face-grain boards of all. Actually, we have found widespread confusion as to what “rift-sawn” actually means. Regardless of the fact that rift-sawing yields almost exclusively vertical end-grain boards, the term "riftsawn" is popularly used to denote boards with its annular rings at a slant–essentially, most anything between flat and vertical. So “riftsawn” means different things to different people--with opposing meanings. But when the term is used correctly, i.e., to saw the lumber in a pattern like spokes of a wheel, “riftsawing” does in fact yields exclusively vertical-grain boards. So much confusion. Our suggestion is to avoid using the wrong and confusing term "quartersawn.” What you’re looking for is boards with vertical end-grain. A visit to a hardwood dealer looking for vertical end-grain boards can be a frustrating experience because you’ll soon discover that only a tiny fraction of the boards or planks in the average dealer’s warehouse actually will have strictly vertical end-grain. True, vertical end-grain timbers are technically superior for instrument making but in practical terms, you have some leeway. When selecting for hardwood lumber to be processed for instrument backs, sides, and necks we make a distinction whether the species is diffuse-porous or ring-porous. Diffuse-porous woods, often called “closed-pore” woods, are woods with small, evenly-distributed pores. Ring-porous woods, often called “open-pore” woods, have a combination of small and large pores, distributed according to the period of the year that they appeared in the log. The open pores on the surface of diffuse-porous species is hard to impossible to see; they are quite plain and evident on ring-porous species. A third category is semi-diffuse-pore species that lie in between, i.e., the pores vary somewhat in size and distribution while remaining relatively small. It happens that providing the material is uniform in texture, closed-pore woods display little difference in the reduction of their stiffness or stability, whether their end-grain is vertical or not. So we relax our requirement for end-grain verticality on woods such as maple, sycamore, poplar and cherry. We are somewhat more strict when selecting semi-diffuse species such as rosewood, walnut and mahogany, because they are semi-diffuse porous. Indeed, we are aware of tests made on vertical, flat and oblique end-grain Honduras mahogany and Spanish cedar samples that showed little variation in stiffness and stability. We are very strict in selecting only the most vertical-grained oak, ash, chestnut, hickory, osage orange, when we choose among domestic species of ring-porous woods such as these. Most often, we purchase pre-dimensioned hardwood back and side sets from instrument-timber suppliers. On the other hand, we saw them on our own into sets from lumber only when we have the opportunity to find suitable planks from hardwood suppliers, lowering our per-set costs dramatically. But we never should go to lumberyards to buy coniferous softwood planks or boards to resaw into soundboards, no matter how "vertical" the grain appears. "Vertical grain" softwood planks are unquestionably an inferior source of high-grade soundboards for luthiers. Rather, we prefer to purchase soundboards from suppliers who obtain the material processed from the log specifically for stringed instruments--rather than sawn from boards. Their soundboard sets are obtained from specialized woodcutters who buck the log at two-foot lengths, hammer in strategically placed wedges into their freshly-sawn circular face to split them apart into blocks. They then take the wedge-shaped blocks and saw the rough soundboards from the split faces. This ensures that the plate’s fibers are precisely aligned with both the plate faces and the edges. The result is a predominant yield of vertical-grained, superior guitar soundboards. So calling soundboards that have vertical-grain that have been processed in this way "quarter-sawn" is nonsensical. Rather, calling them, "split" soundboards makes more sense.

Open pore vs. closed pore
Why does it matter?
Inside a tree trunk, there are tiny tubes called pores that carry water and food while the tree grows. When the tree is cut into wood, these pores leave tiny holes on the surface. How big those holes are and where they sit changes how the wood feels and works. Lots of people think "semi-porous" and "diffuse-porous" mean the exact same thing, but they are actually different! Here is how to tell them apart: "Diffuse-porous" tells us the holes are. In these woods, the pores are spaced out evenly all across the wood, like polka dots spread out on a sheet of paper. "Semi-porous" tells us how the holes change size. In these woods, the holes start out a little bigger in the spring and slowly get smaller by the end of summer. The biggest reason these two words are not the same is that diffuse-porous wood can have big holes or tiny holes. For example, Hard Maple and Honduran Mahogany are both diffuse-porous because their holes are spaced out evenly. But Maple’s holes are so microscopic that the wood feels super smooth, like plastic. Mahogany’s holes are much bigger, leaving long open scratches on the surface that you can feel with your fingers. So, "diffuse-porous" just means the holes are spread out evenly, while "semi-porous" means the holes smoothly change size from big to small as the tree grows. distinction between open-pore, closed-pore, and semi-porous timbers rests fundamentally on the size, density, and spatial arrangement of a tree’s vascular system. In a living tree, vessel elements—often referred to simply as pores—act as microscopic pipework conducting water and nutrients throughout the trunk. Once harvested and converted into lumber, the size and distribution of these residual voids determine a wood’s physical texture, its behavior under hand and machine tools, and the specific finishing techniques required to achieve a stable, level surface. Open-pore timbers, often classified botanically as ring-porous or coarsely diffuse-porous, feature large, distinct vessel openings that are plainly visible to the naked eye. Woods like oak, ash, mahogany, and various rosewoods exhibit this cellular structure, characterized by pronounced vertical channels running along the grain. Tactilely, raw open-pore timber is coarse; running a fingernail across the grain reveals clear ridges and valleys. Closed-pore timbers sit at the opposite extreme. Species such as hard maple, birch, beech, and fine-grained softwoods possess microscopic vessels so small and tightly packed that the raw wood feels slick and continuous even before any finish is applied. Positioned between these two categories are semi-porous woods, including black walnut, cherry, and sycamore. Their vessels are moderate in size and distributed evenly across annual growth rings, yielding a texture that is visually nuanced yet far smoother than that of ring-porous hardwoods. Understanding where a species falls along this spectrum is essential, as cellular porosity directly dictates finishing strategies. When a film-building finish such as lacquer, varnish, or shellac is applied to open-pore wood without preparation, the wet liquid migrates into the cellular cavities. As the solvent evaporates, the finish sinks into these void spaces, producing a dimpled, pitted, or "telegraphed" surface texture rather than a flat sheet. Consequently, achieving a glass-smooth or mirror-like gloss on open-pore stock requires meticulous pore filling—whether through traditional pumice slurries, paste wood fillers, or high-build resins—prior to applying topcoats. By contrast, closed-pore timbers bypass this labor-intensive process entirely, accepting clear coats directly to build a flat, level plane with minimal effort. Semi-porous timbers present a middle ground, where pore filling remains an optional aesthetic choice depending on whether the craftsman desires a natural open-grain look or a sleek, fully leveled sheen. Beyond surface aesthetics, timber porosity influences mechanical workability, adhesive dynamics, and long-term maintenance. In open-pore woods, the stark contrast between dense latewood walls and hollow earlywood vessels can cause cutting tools to chatter or track off line during delicate hand-planing or carving operations. Closed-pore woods yield much more uniformly under edge tools, allowing them to hold razor-sharp structural detail and crisp geometric profiles. Adhesive absorption also varies sharply across porosity types: liquid glues are readily drawn into open vessel lumens through capillary action, which can result in starved glue joints if end grain is not properly sized beforehand. Closed-pore woods keep the adhesive film near the contact interface, ensuring consistent bond lines. Finally, unsealed open-pore surfaces naturally capture and retain environmental dust, skin oils, and shop grime within their exposed vessel banks, whereas closed-pore woods present a continuous barrier that resists surface contamination and wipes clean with ease.
Where and why your glue bonds fail
In the 1990s, I was given permission to audit courses in wood technology at my nearby University of Massachusetts a world-renowned center of the science. Here are excerpts from my notes from my adhesives class.
Imagine holding two blocks of wood together using glue. You might think of a glued joint as a simple three-part sandwich: Wood Block A, the glue, and Wood Block B.
But scientists who study wood bonding look at it much closer. They use the nine-link bond model. This model says a glued joint is actually like a chain made of nine different zones or "links" connecting one piece of wood to the other. Just like a real chain, the entire bond is only as strong as its weakest link!
Here is how those nine links line up, starting from the very center of the glue joint and working outward to the wood on both sides:
-
Link 1: The Adhesive Film – The main, solid layer of cured glue right in the middle.
-
Links 2 and 3: The Intraadhesive Boundary Layers – The very edges of the glue layer that sit right next to the wood.
-
Links 4 and 5: The Adhesive-Adherend Interfaces – The microscopic boundary lines where the glue molecules actually grab onto the wood molecules.
-
Links 6 and 7: The Adherend Subsurfaces – The thin layer of wood just underneath the surface where the wood was cut or sanded.
-
Links 8 and 9: The Adherend Proper – The main, solid pieces of wood themselves.
Why Certain Links Are Most Vulnerable
In the textbook's diagram, Links 2, 3, 6, and 7 are drawn as dashed circles. This is because they are obscured (physically hidden from view) and are the most common spots where things go wrong. Here is why these four links are so fragile:
1. The Damaged Wood Subsurface (Links 6 and 7)
When wood is cut, sawed, or sanded to prepare it for gluing, the blades and sandpaper physically crush and tear the wood fibers right below the surface. (The only tool that doesn't usually do this is a hand plane).
-
The Danger: This leaves a microscopic layer of shattered, weakened wood.
-
The Fix: The liquid glue has to soak deep enough into this damaged subsurface to act like a tiny structural repair crew, gluing the broken fibers back together. If the glue doesn't penetrate and "repair" this zone, the joint will fail right here, because the wood itself is already broken.
2. The Chemically Messed-Up Glue Boundary (Links 2 and 3)
These are the transition layers of glue that sit right against the wood surface.
-
The Danger: When glue is wet, the wood's natural chemistry can "bully" or overpower the first few layers of glue molecules.
-
The Cause: Things like the wood's pH (how acidic or basic it is), its buffering potential (how much it resists chemical changes), or the way the wood selectively sucks up certain ingredients (like water, solvents, or catalysts) can ruin the glue's ability to cure properly. This leaves a weak, under-cured, or brittle layer of glue right at the boundary.
Because these zones are microscopic and hidden inside the joint, woodworkers "go blind" and cannot see these problems happening while the glue is drying. That is why keeping an eye on wood preparation and chemical compatibility is so important to keep these vulnerable links strong!
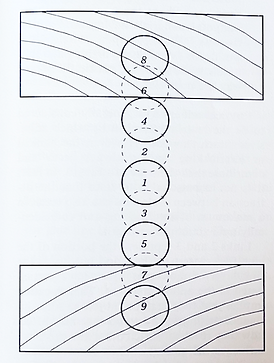
Image credits: Marra, AlanA., Technology of Wood Bonding: Principles in Practice, Van Nostrand- Rheinhold, 1992

The performance of a woodworking tool is fundamentally a delicate balance between edge retention and structural toughness. In metallurgy, this relationship is primarily dictated by the steel's hardness, measured on the Rockwell C scale, or HRC. Understanding where a tool falls on this spectrum—and how that hardness is distributed throughout its form—defines the boundary between a blade that glides effortlessly through hardwood and one that chips, dulls, or snaps under pressure.
The spectrum of woodworking steels can be divided into distinct hardness zones tailored to specific mechanical duties. At the lower end sits steel rated between 52 and 56 HRC, designed for high flexibility and extreme shock absorption. Traditional hand saws, keeping within 52 to 55 HRC, require high flexibility to withstand tension and bending without breaking, while allowing a craftsperson to manually sharpen the teeth with a file and adjust their set with standard tools. Striking tools like axes and adzes inhabit the 54 to 56 HRC range because violent impacts against knots or green wood would instantly shatter a blade that is too brittle.
Moving into the sweet spot of 58 to 62 HRC, one finds the majority of premium Western bench chisels and hand plane irons. This zone represents an ideal compromise for blades that are pushed, pared, or struck with a mallet. Traditional high-carbon steels like O1 and W1, hardened to 58–60 HRC, take a exceptionally fine edge and offer enough toughness to resist chipping. Alloy and powder metallurgy steels such as A2 and PM-V11 stretch this boundary to 60–62 HRC, utilizing elements like chromium, molybdenum, and vanadium to deliver higher wear resistance against abrasive hardwoods.
At the apex of the scale, tools reaching 63 to 66 HRC and beyond prioritize extreme edge sharpness or heat resistance above all else. Traditional Japanese chisels and planes utilize high-carbon White or Blue Paper steels hardened to 63–65 HRC to achieve legendary razor-sharp edges. Meanwhile, lathe turning gouges crafted from High-Speed Steel (HSS) operate at 63–65 HRC to endure the continuous friction and heat generated by fast-spinning wood. Alloyed with tungsten, molybdenum, and cobalt, HSS maintains its temper and cutting edge even when friction raises temperatures significantly.
However, crafting an entire tool from a single uniform hardness often creates an unacceptable metallurgical compromise. A chisel hardened to 65 HRC from tip to tang would shatter like glass when struck with a mallet, whereas a uniform 40 HRC chisel would bend safely but fail to hold a sharp edge. To overcome this paradox, toolmakers vary the hardness across the tool, concentrating high hardness strictly at the cutting tip while maintaining a tough, resilient body.
This multi-hardness approach is achieved through several distinct engineering methods. Traditional Japanese toolmaking uses lamination, forge-welding a thin layer of ultra-hard steel at 63–66 HRC to a thick, soft iron backing. The iron spine absorbs shock and makes grinding easy, allowing the brittle steel edge to endure heavy mallet blows. Western traditions frequently employ differential tempering on a single piece of high-carbon steel, rapidly quenching the cutting tip to 58–62 HRC while tempering the upper body and tang to a soft, springy 35–45 HRC to absorb impacts and lateral forces. Modern industrial tools favor brazed tipping or co-molding, such as circular saw blades with tungsten carbide tips reaching 70+ HRC brazed onto a flexible spring steel core, or bi-metal band saw blades with high-speed steel teeth welded to a fatigue-resistant backing.
Ultimately, the optimal hardness profile of a tool depends on its geometric design and intended application. A razor-thin laminated edge at 65 HRC excels at precise slicing and fine paring, whereas a differentially tempered tool or a carbide-tipped blade provides the vital resilience needed for heavy impacts, high heat, and continuous structural stress.
The physical and chemical behaviors of polyvinylacetate (PVAc), aliphatic resins, and animal protein glues present several critical precautions and operational limits that woodworkers must keep in mind to prevent joint failure:
Polyvinylacetate (PVAc) / Standard White Glues
-
Avoid using under sustained loads (structural "creep"): Because PVAc is a thermoplastic polymer, it has a tendency to deform under continuous stress. Creep and joint failure can occur at relatively low loads, making standard PVAc unsuitable for heavy structural joints.
-
Keep away from heat and high humidity: PVAc bonds soften when exposed to elevated temperatures and lose strength proportionally. Moisture also softens the glue. When high temperature and high moisture are combined, the loss of strength is severely accelerated. In addition, high-density wood species glued with PVAc cannot withstand wide swings in environmental moisture.
-
Never glue in cold temperatures (the "chalking" effect): Applying PVAc glue to a cold surface or wood that is below 60°F (or below the manufacturer’s recommended limit) will prevent the suspended polymer particles from fusing. Instead of forming a continuous, translucent, and strong solid film, the ingredients precipitate out, leaving a telltale chalky, white appearance and a severely weakened, low-strength bond.
-
Work quickly due to short assembly windows: The water emulsion in PVAc is delicately balanced. Only a small amount of water needs to be absorbed by the wood to break the emulsion and trigger solid coalescence. On dry, porous, or low-density woods, a bond can begin forming in as little as 10 minutes, meaning the woodworker must assemble and clamp the joint very quickly to prevent the glue from skinning over.
-
Do not use to fill gaps: PVAc does not promote gap filling. Because it relies on the evaporation of a high volume of water to dry and harden, significant volumetric shrinkage is inevitable. If used in a thick, loose-fitting joint, the shrinking glue line is prone to breaking apart into isolated "islands," ruining the integrity of the joint.
-
Protect the liquid bottle from freezing: Freezing temperatures will physically destroy the delicate water-emulsion inside the container, rendering the liquid glue permanently unusable.
Aliphatic Resins / Yellow "Carpenter's" Glues
-
Prepare for even faster set times: Aliphatics are chemically modified PVAc glues designed to tolerate lower temperatures, provide better creep resistance, and be less sensitive to heat and moisture. However, because they are engineered to be faster-setting, woodworkers must be prepared for an even tighter assembly window when dry-fitting and clamping pieces.
-
Understand thixotropic flow: Aliphatics are highly thixotropic (meaning they behave as a thick gel at rest but become fluid when stirred or sheared). While this is an advantage because it prevents liquid glue from excessively squeezing out and dripping down to ruin adjacent wood surfaces, it requires firm, even spreading to ensure complete coverage.
Animal Protein Adhesives (Hot and Liquid Hide Glues)
-
Restricted to strictly dry, indoor environments: The hardened state of animal protein glue remains chemically sensitive to water and heat, which will readily re-soften the bond. For this reason, these glues should only be used in situations where dryness can be absolutely guaranteed. (Conversely, this exact vulnerability is highly prized by luthiers and furniture makers because it allows chairs, toys, or musical instruments to be easily disassembled for future repairs).
-
Watch the clock on hot glue pots (thermal breakdown): When using hot animal hide glue, leaving the glue in a molten state for prolonged periods causes the protein chains to chemically break down. Although the glue in the pot may look like it is thickening (which is actually just water evaporating), restoring the water will reveal a lower viscosity than the original mix, indicating permanent molecular degradation. Woodworkers should discard any leftover hot glue after a single day in the pot.
-
Expect exceptionally long clamp times with liquid hide glues: To make hide glue usable at room temperature directly from a bottle, manufacturers add gel inhibitors. These inhibitors significantly slow the speed of setting, requiring clamp/press times of 2 to 8 hours (and even longer to reach ultimate strength).
-
Allow brief assembly times to prevent starved joints: Because liquid hide glues have high mobility when first applied, clamping them immediately can squeeze too much glue out of the joint. Woodworkers should allow a brief open assembly period for the glue to lose a bit of moisture and "firm up" before applying full clamping pressure